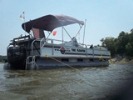
Here we begin to tear down the boat to the aluminum logs and cross channels:
Here we have removed the railings from the deck. Our railings were attached with carriage bolts on top and standard nuts on the bottom. Once these were removed the railings were easily removed from the deck.


3/4 View of Completely Deconstructed. In this step we removed the plywood decking and everything that was on top. We took a grinder and cut off the bolts from the bottom side of the boat. You may need to pull your carpet up and determine how your deck is currently fastened, as not all pontoons were built the same.

We decided we would grind down the rust on top of the channels with an angle grinder and give them a good coat of Rustoleum Spray Paint to prevent furthur corrosion. This can be found at any home improvement store for about $3.00 a can. *Notice the front half of the pontoon compared to the rear. The front has been cleaned with Sharkhide Aluminum Cleaner and is neatly restored to a dull grey color. We will polish the toons with the Sharkhide Polish a little down the road.

We then added the decking. We used our 4'x8' CCA Treated Marine Grade Plywood. We secured the decking to the cross channels with our 2" Stainless Steel Deck Screws.

Next up was a 22oz Marine Grade Carpet

RECONSTRUCTION, FINALLY!