My South Bay 925(ish) has an 'in-tube tank'. When I got it home, I noticed that the top of it is slightly concave. I didn't think much of it until last year when I noticed that water was occasionally collecting on the top of it.
I am concerned that it will get past gaskets and O-rings and contaminate the fuel.
I will be doing several projects this year to help mitigate the problem. There is little else I can do, other than replace the tank. I was wondering if any other South Bay (or other brands) guys have run into this?
South Bay fuel tank water issue
Moderators: Redneck_Randy, badmoonrising, lakerunner
South Bay fuel tank water issue
ToddBob
'Al the Mirthmaker' (The Third)
Build-- viewtopic.php?f=16&t=14007
Rainy Lake/Voyageurs National Park
International Falls, MN
'Al the Mirthmaker' (The Third)
Build-- viewtopic.php?f=16&t=14007
Rainy Lake/Voyageurs National Park
International Falls, MN

Re: South Bay fuel tank water issue
I think I know where your water is coming from. What year is your South Bay? Mine is an '07 and I spoke to South Bay about this. I'll check back later and tell you what I've done on mine and my conversations with South Bay, but first let me know your year. Thanks.
2007 South Bay 925 Tri-toon
5.7 Volvo I/O
Tow Vehicle: Toyota Tundra, 1794 Edition
5.7 Volvo I/O
Tow Vehicle: Toyota Tundra, 1794 Edition
Re: South Bay fuel tank water issue
Thanks mate. Interested to hear what you ended up doing.woolznaz wrote:I think I know where your water is coming from. What year is your South Bay? Mine is an '07 and I spoke to South Bay about this. I'll check back later and tell you what I've done on mine and my conversations with South Bay, but first let me know your year. Thanks.
Not exactly sure what year. Likely 2007-2010 ish.
I have a wood lid that goes over the tank and the water is surely getting in the crack.
I am going to use wider aluminum trim screwed to the lid, but covering the crack and beyond. Along with that, I will be putting better quality weatherstripping under the aluminum to make a seal where it touches the floor. I will be paying extra special attention to the back of the lid where the water tends to run to because of the tilt of the boat.
As well, I am going to do some work inside the tube to make sure water doesn't have a chance to get to the top of the tank.
This all will happen in the next couple of weeks and I will post the shots in my build thread as pictures will explain all this much better.
I was just wondering if anyone else had a concave tank top?
ToddBob
'Al the Mirthmaker' (The Third)
Build-- viewtopic.php?f=16&t=14007
Rainy Lake/Voyageurs National Park
International Falls, MN
'Al the Mirthmaker' (The Third)
Build-- viewtopic.php?f=16&t=14007
Rainy Lake/Voyageurs National Park
International Falls, MN
Re: South Bay fuel tank water issue
tuned, I apologize for the slow reply. It sounds like you have it pretty well figured out, but I'll still share my experience. The middle toon has 5 chambers (if you have in-floor storage). 2 are pressurized (the one in the bow and the one between the in-floor storage and the gas tank) and 3 are not pressurized. The gas tank chamber is clearly not pressurized. I noticed my gas gauge going a little goofy one day and when I opened up the port in the floor to look at the tank I saw water on top of the tank. Like you, I worried about water in the fuel (never happened), as well as where in the world all that water was coming from! The tank fills up a HUGE part of that compartment, so it does not take much water to fill up the rest of it. Fortunately there is a drain plug so it was easy to drain it out, but I wanted to stop the water.
Your water is likely coming in where caulking used to be between the metal framing and the wood floor. Here is how South Bay explained it to me (partial quote): A leak can develop between the wood paneling used for the flooring, and the aluminum framework around the engine/fuel compartments. The water dams up in front of the frame, and works the caulking out between the floor and the frame. The vents help, but there is an additional ‘fix’ that should be done.
They acknowledged the problem and by "additional fix" they are talking about doing some minor "surgery" on the boat to put a different sealant between the flooring and the metal framing. I have done that now and it did address the problem. I'm not 100% dry there now, but very close.
Here is what I did. With all of the underskin on the bottom they recommended I approach it from the topside. I know yours is a custom build, but I'll explain it as if it were a stock South Bay 925 floor plan. I bet you will follow what I'm saying. I took my back seat out, as well as the "bulkhead" running left to right between the engine compartment and the storage/changing room area. I also took the bulkhead out that ran between the back of the back seat and the front of the storage/changing room area. Then I took the back seat out as well. This allows total access to the area.
At that point, from the helm of my boat I could look directly into the engine compartment. You have to remove all of that to get the one piece of flooring up to address the issue. You then take the flooring piece up that covers the gas tank area. Your problem is where the remaining wood floor (3 sides - left, right, and front). There is no more floor behind that point as the engine compartment begins right behind this section of flooring you have removed. You then loosen these 3 surrounding floor pieces (hard to find screws in the carpet, but you can find them) and pry them up a little. Then put some better adhesive/caulking/sealant material in between these pieces of flooring and the metal framing. Then re-secure them with some additional self-tapping screws. South Bay sent me the screws and the adhesive they recommend.
It took me about two or three nights of work to deal with. While I had it apart I took it to the lake and ran it and could see where the water was coming in. My water was coming from two places. First, I had a hole drilled in the front of the gas tank compartment (why???? -- I still don't know why that was there) and when water turbulence built up water was squirting in through that hole. It was a constant stream in choppy water running kind of hard. I filled the hole with a screw and some caulking. The rest of the water was coming in from where the caulking had failed between the flooring and the framing as South Bay predicted above.
In addition to doing the floor removal and caulking/resecuring, some guys have drilled a small drain hole between the engine compartment and the fuel tank compartment, as low as they can get it drilled. The point of this is to let water flow from the fuel tank section to the bilge in the engine compartment. That way if any water gets in it will drain out to the engine compartment and the bilge pump will handle it. If I did that I would put some kind of plug in and just let it drain to the engine compartment bilge when I opened that drain plug. I have not done that because I really get hardly any water in there anymore.
The South Bay recommended fix as described above seems to be working well for me. I have to run it kind of hard in really choppy water to get anything in there anymore. **** If you do the drilling/drain hole suggestion, be VERY careful drilling because you could very easily drill into the fuel tank !!!!!! *****
I have some pictures of my boat when I had it taken partially apart if you want them. I have some shots showing where the water was coming in.
Good luck on your fix. While I wish I never had the issue, I will say that South Bay was great to work with on this and they owned up to it and worked me through the fix. I bought the boat used and am not really their customer, in that sense, but they have been great to work with.
2007 South Bay 925 Tri-toon
5.7 Volvo I/O
Tow Vehicle: Toyota Tundra, 1794 Edition
5.7 Volvo I/O
Tow Vehicle: Toyota Tundra, 1794 Edition
Re: South Bay fuel tank water issue
Thanks for the info Woolznaz.
We have some similarities:
I have already drilled a large pass-thru hole from the fuel compartment to the engine area (bilge). Safety regulations allow for a 1" hole maximum.
We have some major differences:
My tank area is not filling from the bottom. I am only getting water on TOP of the tank-presumably from above. The water is pooling there about 1/8" deep. I have no idea why the tank is concave like that, but I must live with it or replace it (not too likely).
My lid removes easily. It is not stock. It is 3/4 plywood with vinyl flooring. Then I have aluminum flat strip screwed to the lid but hanging out further all the way around so that I can glue weatherstripping to the aluminum to make a seal. It is these strips and seals that I am going to try to beef up.
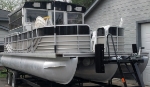
This first shot is a top view of the tank area.

Here's the existing lid installed. It just lifts up with no messing around so easy access. It's important that I can just lift this lid off, as my fuel filter is in there.

I'll also try to find some sort of water absorbtion ball or device so that it cannot pool on the tank. I'll have to pull it out from time to time so it can dry. The round inspection hatch should work well for this.
Summary. Envision wider aluminum strips with thicker weatherstripping. I have one final trick to try. It's hard to describe, but I'll get a picture when it's installed.
We have some similarities:
I have already drilled a large pass-thru hole from the fuel compartment to the engine area (bilge). Safety regulations allow for a 1" hole maximum.
We have some major differences:
My tank area is not filling from the bottom. I am only getting water on TOP of the tank-presumably from above. The water is pooling there about 1/8" deep. I have no idea why the tank is concave like that, but I must live with it or replace it (not too likely).
My lid removes easily. It is not stock. It is 3/4 plywood with vinyl flooring. Then I have aluminum flat strip screwed to the lid but hanging out further all the way around so that I can glue weatherstripping to the aluminum to make a seal. It is these strips and seals that I am going to try to beef up.
This first shot is a top view of the tank area.

Here's the existing lid installed. It just lifts up with no messing around so easy access. It's important that I can just lift this lid off, as my fuel filter is in there.

I'll also try to find some sort of water absorbtion ball or device so that it cannot pool on the tank. I'll have to pull it out from time to time so it can dry. The round inspection hatch should work well for this.
Summary. Envision wider aluminum strips with thicker weatherstripping. I have one final trick to try. It's hard to describe, but I'll get a picture when it's installed.
ToddBob
'Al the Mirthmaker' (The Third)
Build-- viewtopic.php?f=16&t=14007
Rainy Lake/Voyageurs National Park
International Falls, MN
'Al the Mirthmaker' (The Third)
Build-- viewtopic.php?f=16&t=14007
Rainy Lake/Voyageurs National Park
International Falls, MN
-
curtiscapk
- Posts: 5445
- Joined: Mon Nov 10, 2008 8:31 am
- Location: OP KS\Hillsdale Lake
Re: South Bay fuel tank water issue
is that a heater Todd???????!!!!! 

Craig and Paula
"THE FLOATER" rebuild Spring 2013
viewtopic.php?f=2&t=15328
94 Party Barge 24' 115 merc
Turning Point hustler 14 x 13 prop
22mph gps 3 people
12 F150
Overland Park Ks
Hillsdale Lake, KS
"THE FLOATER" rebuild Spring 2013
viewtopic.php?f=2&t=15328
94 Party Barge 24' 115 merc
Turning Point hustler 14 x 13 prop
22mph gps 3 people
12 F150
Overland Park Ks
Hillsdale Lake, KS
Re: South Bay fuel tank water issue
Actually that looks to be a easy fix, from here at least. Gather up some pvc pipe and some fittings and then make a raised cross-member of pipe let's say 4" tall with the legs on each end going into a three way coupling. Insert a couple of short pieces into each side of the coupling on both sides and you should have a stable support that will sit on top of your tank. Then all you'll need is is a waterproof barrier material of some sort big enough to go over the pvc structure and tuck down around the parameter of the gas tank. This will shed off the top of the tank and resolve the water puddle.
Respect Our Recreational Resources
Leaving Only "The Footprints of Your Passing"
Boating the Muskingum River
1972 35' Crest Pontoon Houseboat
2007 90 hp. Yamaha
Leaving Only "The Footprints of Your Passing"
Boating the Muskingum River
1972 35' Crest Pontoon Houseboat
2007 90 hp. Yamaha
Re: South Bay fuel tank water issue
There's ALWAYS a heater in my shots, Craig. I blame my neighbors to the northcurtiscapk wrote:is that a heater Todd???????!!!!!
When I was growing up we used to shoot tennis balls across the river at 'em. They would pick them up and shoot them back. Nowadays, I probably would have a fleet of helicopters over me.
Last edited by tuned on Tue Mar 17, 2015 7:18 am, edited 1 time in total.
ToddBob
'Al the Mirthmaker' (The Third)
Build-- viewtopic.php?f=16&t=14007
Rainy Lake/Voyageurs National Park
International Falls, MN
'Al the Mirthmaker' (The Third)
Build-- viewtopic.php?f=16&t=14007
Rainy Lake/Voyageurs National Park
International Falls, MN
Re: South Bay fuel tank water issue
Good one Bamby. I already have some 'tarp grabbers' installed to the bottom of the square aluminum tube crossmember in the above pic. As a last resort, I intend to hang tarp and tuck it into the edges as you suggested. The only problem is a fair number of hoses and wires (not all showing in the picture). I would need to cut and 'paste' around each of these.Bamby wrote:Actually that looks to be a easy fix, from here at least. Gather up some pvc pipe and some fittings and then make a raised cross-member of pipe let's say 4" tall with the legs on each end going into a three way coupling. Insert a couple of short pieces into each side of the coupling on both sides and you should have a stable support that will sit on top of your tank. Then all you'll need is is a waterproof barrier material of some sort big enough to go over the pvc structure and tuck down around the parameter of the gas tank. This will shed off the top of the tank and resolve the water puddle.
ToddBob
'Al the Mirthmaker' (The Third)
Build-- viewtopic.php?f=16&t=14007
Rainy Lake/Voyageurs National Park
International Falls, MN
'Al the Mirthmaker' (The Third)
Build-- viewtopic.php?f=16&t=14007
Rainy Lake/Voyageurs National Park
International Falls, MN

Re: South Bay fuel tank water issue
I was thinking the same, except on the inside of the tank. Jam something in there that bows the top up.
Lot's of the tanks do this, because they have no internal supports. Over time they warp. Personally, I've never had an issue. But then again, I'm not sure I've kept a toon long enough to know
Lot's of the tanks do this, because they have no internal supports. Over time they warp. Personally, I've never had an issue. But then again, I'm not sure I've kept a toon long enough to know
Just one boat...after another, after another 
-
curtiscapk
- Posts: 5445
- Joined: Mon Nov 10, 2008 8:31 am
- Location: OP KS\Hillsdale Lake
Re: South Bay fuel tank water issue
ToonGuy wrote:I was thinking the same, except on the inside of the tank. Jam something in there that bows the top up.
Lot's of the tanks do this, because they have no internal supports. Over time they warp. Personally, I've never had an issue. But then again, I'm not sure I've kept a toon long enough to know
awesome idea!
Craig and Paula
"THE FLOATER" rebuild Spring 2013
viewtopic.php?f=2&t=15328
94 Party Barge 24' 115 merc
Turning Point hustler 14 x 13 prop
22mph gps 3 people
12 F150
Overland Park Ks
Hillsdale Lake, KS
"THE FLOATER" rebuild Spring 2013
viewtopic.php?f=2&t=15328
94 Party Barge 24' 115 merc
Turning Point hustler 14 x 13 prop
22mph gps 3 people
12 F150
Overland Park Ks
Hillsdale Lake, KS
Re: South Bay fuel tank water issue
tuned, it sounds like yours is coming in from the top, but you may want to take some steps to make sure of that. Mine seemed that way too. If my boat was out in the weather and there was any source of water from above, then I would have never guessed it was not coming from above. Like yours, the top of my tank would be wet, too, with some water pooling there. If fact that was the only evidence there was a problem, but the source was actually coming in as described in my post above.
It was odd. The tank would be wet -- but how? I live in AZ, it had not rained for months and my boat is stored in a garage. It would only happen after taking the boat to the lake. In my case, it was lake water despite the "evidence" being on the top of the tank.
Here are a few pictures of mine when I was working on it. Check out the stream of water flowing in while under power in choppy water. I have no idea why this hole was drilled in there, but you can see water pouring in. In the stock layout, there is no way to see that area unless you remove the back seat, the changing room area, and then get that floor panel up as described above. I realize your layout is different. Also, on the photo that is called "looking toward bow" (2nd photo below), look closely at the water streaks coming down the inside of the framing. The only way I could get water to seep in and run down there was was also running hard in choppy water. That is the area where South Bay was telling me I could find the water coming in due to the failed seal between the framing and the floor. They were right about that in my case. It was exactly as they described in red in my post above. I am posting that picture so you can see what to look for while you are in there -- just in case yours is letting water in that way, too. There was just enough water getting in that it would be on top of the tank at times.The top of the tank would be wet, yet it was not coming in from the top.
All I am saying is if you have an opportunity to look in there while you are running (you will not need to remove all of the interior as us stock guys have to do) then I would do it. Look closely, while under power, in choppy water, at the area where the floor meets the framing. South Bay was dead on in describing the likely problem and the fix as well in my case.
- Attachments
-
- photo 4.JPG (123.43 KiB) Viewed 5933 times
-
- Looking toward bow.JPG (115.86 KiB) Viewed 5933 times
-
- stream coming in under power.jpg (285.03 KiB) Viewed 5931 times
2007 South Bay 925 Tri-toon
5.7 Volvo I/O
Tow Vehicle: Toyota Tundra, 1794 Edition
5.7 Volvo I/O
Tow Vehicle: Toyota Tundra, 1794 Edition
Re: South Bay fuel tank water issue
After several re-readings, I totally got your post, Woolznaz. As I am fully underskinned, I will also have to approach from above. As well as my planned repairs, I will inspect for any forward holes and fill them.
The running test will have to wait until 3 feet of ice come off the lake, but I will most certainly do it as it is so easy to remove my lid.
As far as Ty's suggested repair (wedge a prop inside), I wish I had addressed this when I had a LARGE hole open in the tank to install my fuel pump. It would have been easy then. Not gonna happen now as the pump was many, many hours to install. I dread touching it again.
ToddBob
'Al the Mirthmaker' (The Third)
Build-- viewtopic.php?f=16&t=14007
Rainy Lake/Voyageurs National Park
International Falls, MN
'Al the Mirthmaker' (The Third)
Build-- viewtopic.php?f=16&t=14007
Rainy Lake/Voyageurs National Park
International Falls, MN
-
curtiscapk
- Posts: 5445
- Joined: Mon Nov 10, 2008 8:31 am
- Location: OP KS\Hillsdale Lake
Re: South Bay fuel tank water issue
tuned wrote:There's ALWAYS a heater in my shots, Craig. I blame my neighbors to the northcurtiscapk wrote:is that a heater Todd???????!!!!!.
When I was growing up we used to shoot tennis balls across the river at 'em. They would pick them up and shoot them back. Nowadays, I probably would have a fleet of helicopters over me.
Those were the days!
- Attachments
-
- tenniscannon.png (17.51 KiB) Viewed 5845 times
Craig and Paula
"THE FLOATER" rebuild Spring 2013
viewtopic.php?f=2&t=15328
94 Party Barge 24' 115 merc
Turning Point hustler 14 x 13 prop
22mph gps 3 people
12 F150
Overland Park Ks
Hillsdale Lake, KS
"THE FLOATER" rebuild Spring 2013
viewtopic.php?f=2&t=15328
94 Party Barge 24' 115 merc
Turning Point hustler 14 x 13 prop
22mph gps 3 people
12 F150
Overland Park Ks
Hillsdale Lake, KS
Re: South Bay fuel tank water issue
They were indeed. We started out with hairspray, WD40 and starting fluid. Eventually graduated to gasoline. Amazing any of us livedcurtiscapk wrote:tuned wrote:There's ALWAYS a heater in my shots, Craig. I blame my neighbors to the northcurtiscapk wrote:is that a heater Todd???????!!!!!
When I was growing up we used to shoot tennis balls across the river at 'em. They would pick them up and shoot them back. Nowadays, I probably would have a fleet of helicopters over me.
Those were the days!
ToddBob
'Al the Mirthmaker' (The Third)
Build-- viewtopic.php?f=16&t=14007
Rainy Lake/Voyageurs National Park
International Falls, MN
'Al the Mirthmaker' (The Third)
Build-- viewtopic.php?f=16&t=14007
Rainy Lake/Voyageurs National Park
International Falls, MN